ELBE Overview
Debian based system to generate root-filesystems for embedded devices.
General Notes
Generally root-filesystem creation faces the following requirements:
- Creation of root-filesystem for a specific architecture.
- Generation of a development environment for the specific architecture.
Trying to solve this via cross-compilation of the required packages, we face the following problems:
- Many packages are not designed and tested for cross-compilation.
- Big projects consume a significant amount of time to cross compile.
- Dependencies are not resolved automatically. The developer is required to manually find out which package versions of dependencies are required.
- Changes and patches to the packages need to be updated for newer versions. This process makes an update a very time consuming process.
- One must make sure that the same toolchain is used in the development environment and in the root-filesystem.
Elbe takes a different approach for solving these problems:
- Standard packages are not self compiled. Elbe uses the Debian distributions binary packages.
- Own applications are not cross compiled. They are built natively on the target architecture in a chroot environment using qemu.
- The root-filesystem is a subset of the Debian system inside the chroot environment. This implicitly ensures, that the same toolchain is used on the development machine and on the target.
- Updating, adding or removing a package is done via Debians package-management (apt) which also resolves package dependencies.
Installation
Elbe is shipped as Debian package. This package will pull in the necessary dependencies.
Configure /etc/apt/sources.list.d appropriately:
echo 'deb http://debian.linutronix.de/elbe jessie main' >> /etc/apt/sources.list.d/elbe.list
Optionally the public key for the repo can be installed:
wget http://debian.linutronix.de/elbe/elbe-repo.pub && apt-key add elbe-repo.pub
Update the package list:
aptitude update
and install elbe using the following command:
aptitude install elbe
Overview
The Elbe system consists of the program elbe which is implemented in
Python. Similar to git, it can be called with several sub commands. For
example:
elbe <command>
elbe initvm create --directory /scratch/example example.xml
elbe chg_archive example.xml archive.tar.bz2
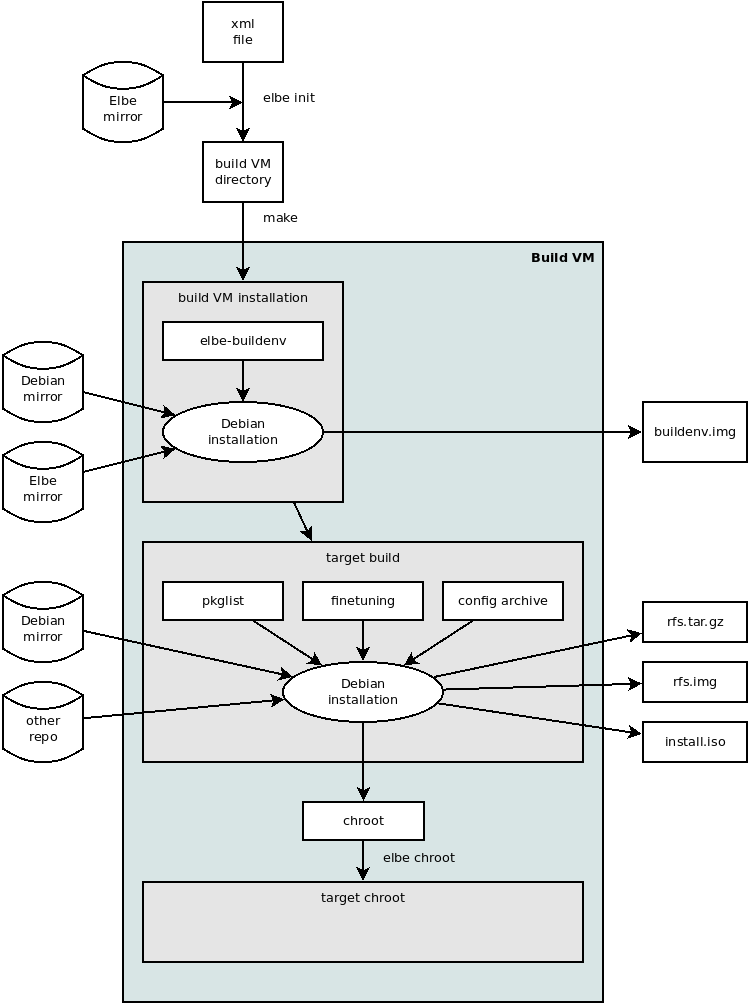
An Elbe project consists of an XML file that describes the project.
This xml File is processed inside a virtual machine, because we need root privileges to create the Rootfilesystem. This virtual machine is called initvm in the following text.
When an xml File is now submitted into the initvm, the following happens:
- Debian’s debootstrap utility is used to setup a Debian base system.
- The packages specified in the package list of the XML file are installed to the base system. The result of this is called the build environment.
- A copy of the environment is used as the target system. There is a set of different modes for this copy.
- If the XML file contains an archive, it will be unpacked into the target, so the fine-tuning commands can use the content of the archive, too.
- Inside a chroot environment, the fine-tuning commands are applied to the target.
- The archive from the XML file is unpacked again. This is to ensure the target filesystem contains all files from the archive, even if some of them have been deleted by a fine-tuning command.
- According to what is specified in the XML file, the target filesystem is then baked into a tar archive and/or a filesystem image.
This diagram illustrates the complete process:
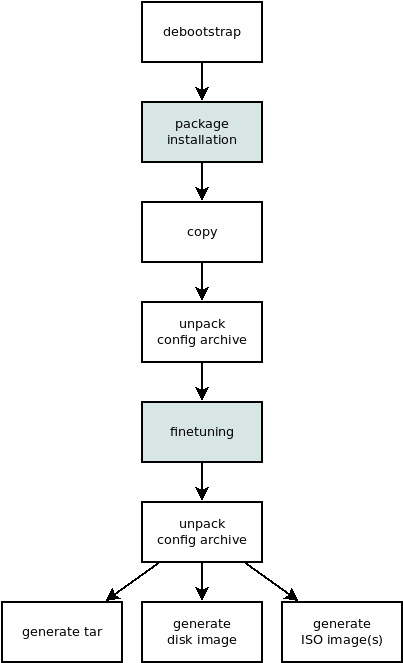
The following figure shows the steps performed inside the build VM during the build process of the target. The highlighted steps are performed inside a chroot environment:
On regular Debian installations, init scripts installed by packages are started automatically during the post-installation step. Please note that Elbe will not start any services during package installation.
As a consequence, packages that require a specific service to be running will cause problems during installation. This typically includes database application packages, which set up a database in their postinst script and rely on the database server to be already running.
Create initvm and build a first xml file from the examples
In order to use elbe, a user needs to be member of the libvirt
system group.
To create an initvm and make that initvm build a first Rootfilesystem, use the following command:
elbe initvm create --directory ~/elbe-initvm /usr/share/doc/elbe-doc/examples/x86_32-pc-hdimg-minimal-grub-wheezy.xml
This will take quite a while.
Only one initvm may run on a single computer. If an initvm is already running in the background, this command will exit with a failure notice.
The initvm will keep on running, after this command. Further xml Files may be built using
elbe initvm submit --directory ~/elbe-initvm /usr/share/doc/elbe-doc/examples/x86_32-pc-hdimg-minimal-grub-wheezy.xml
The initvm will not be restarted upon a reboot of the machine.
If you need to start the initvm again, use
elbe initvm start --directory ~/elbe-initvm
Example XML Files
A root-filesystem-project is described with a XML file.
Elbe ships with a set of example XML files.
The following XML file describes a simple system in the default full
copy mode. The root filesystem is essentially identical to the build
environment and it will be saved as nfsroot.tar.gz
example.xml.
<ns0:RootFileSystem xmlns:ns0="https://www.linutronix.de/projects/Elbe"
        xmlns:xsi="http://www.w3.org/2001/XMLSchema-instance"
        created="2009-05-20T08:50:56" revision="6"
        xsi:schemaLocation="https://www.linutronix.de/projects/Elbe dbsfed.xsd">
        <project>
                <name>ARMexample</name>
                <version>08.15</version>
                <description>full featured debian system</description>
                <buildtype>armel</buildtype>
                <mirror>
                        <primary_host>debian.tu-bs.de</primary_host>
                        <primary_path>/debian</primary_path>
                        <primary_proto>http</primary_proto>
                        <url-list>
                                <url>
                                        <binary>http://debian.linutronix.de/elbe wheezy main</binary>
                                </url>
                        </url-list>
                </mirror>
                <noauth />
                <suite>wheezy</suite>
        </project>
        <target>
                <hostname>myARM</hostname>
                <domain>tec.linutronix.de</domain>
                <passwd>foo</passwd>
                <console>ttyS0,115200</console>
                <package>
                        <tar>
                                <name>nfsroot.tar.gz</name>
                        </tar>
                </package>
                <finetuning>
                </finetuning>
                <pkg-list>
                        <pkg>bash</pkg>
                        <pkg>openssh-server</pkg>
                </pkg-list>
        </target>
</ns0:RootFileSystem>
To generate the project directory from the XML file the following command is used:
elbe initvm submit --directory ~/elbe-initvm example.xml
The directory ~/elbe-initvm must contain a running initvm. If an
initvm has not been created yet, use:
elbe initvm create --directory ~/elbe-initvm example.xml
Changing the subset that is extracted as the root filesystem
Elbe has several methods to select the subset that is packaged as the root-filesystem.
- The finetuning section allows to remove, copy or move files before the archive will be extracted and the target image is generated.
- The install-recommends tag.
- The initial copy has several modes, which allow to extract very small subsets.
- The embedded archive.
Finetuning
The finetuning section allows to copy, move and delete files in the root-filesystem. Additionally it is possible to run commands. Here is an example finetuning section:
<finetuning>
<rm>/usr/share/doc</rm>
<mkdir>/mydir</mkdir>
<mknod opts="c 1 5">/dev/zero</mknod>
<buildenv_mkdir>/mydir</buildenv_mkdir>
<cp path="/copy/me">/my/destination</cp>
<buildenv_cp path="/copy/me">/my/destination</buildenv_cp>
<b2t_cp path="/copy/me">/my/name/on/target</b2t_cp>
<t2b_cp path="/copy/me">/my/name/on/buildenv</b2t_cp>
<mv path="/var">/var_ro</mv>
<buildenv_mv path="/var">/var_ro</buildenv_mv>
<command>echo "T0:23:respawn:/sbin/getty -L ttyO0 115200 vt102" >> /etc/inittab</command>
<buildenv_command>some_command</buildenv_command>
<purge>apt</purge>
<addgroup>mygroup</addgroup>
<adduser groups='mygroup,audio' passwd='huhu' shell='/bin/zsh'>manut</adduser>
<adduser passwd='test' shell='/bin/bash'>test</adduser>
</finetuning>
- Remove the directory /usr/share/doc from the target.
- Create the directory /mydir on the target.
- Create the character device /dev/zero with major number 1 and minor number 5 on the target.
- Create the directory /mydir in the build environment.
- Copy /copy/me on the target to /my/destination.
- Copy /copy/me in the build environment to /my/destination.
- Copy /copy/me from the build environment to /my/name/on/target on the target.
- Copy /copy/me from the target to /my/name/on/buildenv in the build environment.
- Move /var to /var/ro in the target root filesystem.
- Move /var to /var/ro in the build environment.
- Execute the given command in the target root filesystem. In this example a line is added to /etc/inittab in order to permit logins via the serial console.
- Execute some_command in the build environment.
- Remove the apt package from the target root filesystem using dpkg –purge.
- A group with the name mygroup is created.
- Adds the user manut with /bin/zsh as default shell. A group with the same name as the user is always created and is the default group. manut is additionally added to the groups mygroup and audio. manuts login password is huhu. The groups attribute is optional, passwd and shell are mandatory.
The copy, mv, and rm commands operate on full directories.
Useful directories to trim with finetuning
This section provides some useful directories that can be safely removed to get a smaller target image.
<finetuning>
        <rm>/usr/share/doc</rm>
        <rm>var/cache/apt/archives/*</rm>
        <rm>var/cache/apt/pkgcache.bin</rm>
        <rm>var/cache/apt/srcpkgcache.bin</rm>
        <rm>var/lib/apt/lists/*_Release</rm>
        <rm>var/lib/apt/lists/*_Packages</rm>
        <rm>var/lib/apt/lists/*_Sources</rm>

        <rm>boot</rm>

        <rm>lib/modules/2.6.32-5-versatile/</rm>
        <rm>var/cache/man/*</rm>
        <rm>var/cache/elbe</rm>
        <rm>var/cache/debconf/*</rm>
</finetuning>
- The doc files are not necessary on an embedded target.
- The apt cache can be downloaded again if necessary.
- The boot directory contains the kernel used for the VM. On embedded targets the kernel is normally loaded by the bootloader.
- The kernel modules for the standard Debian kernel.
- The man page cache
- The full copy mode will also copy elbe onto the root-filesystem.
- debconf cache is also not necessary
Archive
It’s also possible to include an archive into the XML file, that is unpacked into the target root-filesystem after the finetuning step. This archive must be a bzip2 compressed tar (.tar.bz2) and the following command can be used to embed the archive into the XML file:
elbe chg_archive <xmlfile> archive.tar.bz2
This feature is useful to place custom configuration-files into the final image.
Slimming the root filesystem with the different modes
The copying process has several modes. The mode is configured in the target tag. It needs to be the tag before finetuning.
The following commented example illustrates where the mode is configured.
<target>
  <hostname>example</hostname>
  <domain>example.com</domain>
  <passwd>foo</passwd>
  <package>
          <tar>nfsroot.tar.gz</tar>
  </package>

  <diet />

  <install-recommends />

  <finetuning \>
  <pkg-list>
          <pkg>bash</pkg>
  </pkg-list>

</target>
- The mode is configured at this place, leaving it out, enables the default mode.
- install-recommends should be placed here.
install-recommends
install-recommends enables installation of recommended packages. This can make the root-filesystem a lot bigger. With the default setting, installed programs will still work, but some functionality requiring external programs might be disabled.
This is not strictly a mode as described in the following paragraphs. It can be combined with any of them, and the following modes are mutually exclusive.
default
The default mode generates a full copy of the build image. This mode is the easiest to use, but its not possible to generate images which have the Debian package management removed.
setsel
The setsel mode can be used to generate images which only contain dpkg, and offers a more fine-grained control on which packages are installed.
The recommended usage is as follows:
- Generate an image in the default mode.
- Run the image and use aptitude to purge unwanted packages.
- Maybe even use dpkg to remove apt and aptitude.
- Then generate the list of selected Packages using
dpkg --get-selections > selections.list - Transfer this file to the host System.
- Use
elbe setsel <xmlfile> selections.listto import the pkg-list into the XML file. - Rebuild using setsel mode.
The setsel mode works by feeding the pkg list to
dpkg --set-selections in the target image copy. It has the advantage
that there is no need to cope with some unregistered configuration
files.
diet
Diet Mode only copies the files that are referenced in the Package management. It resolves the dependencies so that one does not need to reference library packages.
Some packages rely on files generated in the post-inst scripts, which are not tracked by the package management. Work is in progress to execute the post-inst scripts in the target copy, but there are still some problems with corner-cases, when dependencies of these scripts get removed in the finetuning.
These Errors are hard to find. And slow down development of an RFS. Diet Mode is intended to build small root-filesystems. E.g. to add some packages, like openssh-server, to a busybox based system.
Do not use this for normal filesystems.
This also holds for the tighten mode.
tighten
Tighten mode only extracts the files referenced by the packages in pkg-list. No dependencies are resolved. This mode is intended for compatibility with old XML files, do not use in new elbe projects.
CDROM Functionality
Elbe creates a CDROM iso image with all the installed packages. It is
created in the build directory, and its filename is install.iso This
can also serve as an installation source.
<mirror>
        <cdrom>/home/user/elbe-example/install.iso</cdrom>
</mirror>
Install Reports
The build process also creates a report file in asciidoc format:
elbe-report.txt can be converted to html using the following
command:
asciidoc elbe-report.txt
This report lists all files in the root-file-system, including the origin Debian package.
Validation
After a build the source.xml file includes informations about all
installed packages and versions. If this information is already present
in a file used with elbe create the installed package versions and
md5 hashes are validated and a report is printed and saved to
validation.txt. This file is also in asciidoc format.
XML Reference
This section is a step by step explanation of the ARM example.
The XML file starts with the following header, which should always be the same:
<ns0:RootFileSystem xmlns:ns0="https://www.linutronix.de/projects/Elbe"
     xmlns:xsi="http://www.w3.org/2001/XMLSchema-instance"
     created="2009-05-20T08:50:56" revision="6"
     xsi:schemaLocation="https://www.linutronix.de/projects/Elbe dbsfed.xsd">
After this header follows the project description.
<project>
        <name>ARMexample</name>
        <version>08.15</version>
        <mirror>
                <primary_host>debian.tu-bs.de</primary_host>
                <primary_path>/debian</primary_path>
                <primary_proto>http</primary_proto>
                <url-list>
                        <url>
                                <binary>http://debian.linutronix.de/elbe wheezy main</binary>
                        </url>
                </url-list>

        </mirror>
        <noauth />
        <suite>wheezy</suite>
- The mirror tag contains primary_host, primary_path and primary_proto. It describes the Debian mirror used.
- The url-list can contain additional package sources.
- The noauth tag can be used to disable authentication if custom unsigned packages are supposed to be installed.
- The suite selects the distribution codename used from the primary mirror.
the project tag isn’t closed yet.
The following section describes the virtual machine in which the debian-installer is executed and custom packages can be build.
        <buildimage>
                <arch>armel</arch>
                <size>20G</size>
                <mem>256</mem>
                <interpreter>qemu-system-arm</interpreter>
                <console>ttyAMA0,115200n1</console>
                <machine>versatilepb</machine>
                <NIC>
                        <model>smc91c111</model>
                        <MAC>de:ad:be:ef:be:05</MAC>
                </NIC>
                <portforwarding>
                        <forward>
                                <proto>tcp</proto>
                                <buildenv>22</buildenv>
                                <host>5022</host>
                        </forward>
                </portforwarding>
                <pkg-list>
                        <pkg>buildd</pkg>
                </pkg-list>
        </buildimage>
</project>
- arch is the Debian architecture of the target. (optional)
- size is the size of the hard-disk image. (optional)
- mem controls the amount of RAM that is allocated to the virtual machine. (optional)
- The interpreter is either qemu-system-<arch> or qemu-kvm. Usage of kvm is usually only possible, when the target is x86. (optional)
- The console line needs special attention because it is different on different emulation targets. (optional)
- The machine tag contains the -machine parameter, that is provided to qemu. (optional)
- portforwarding of network server ports from the virtual machine to the host. This example forwards the ssh port to port 5022 on the host. (optional)
- This is the list of packages that are only installed to the buildimage. (The packages listed in the target sections pkg-list are installed to the target image and the buildimage.) It can be used for example to install the debian build server into the buildenvironment. (optional)
The optional parameters are normally set to defaults by the buildtype tag. The tags can be used for advanced use of elbe; to override the defaults.
If the optional parameters are not set, the buildtype can even be overridden by the flag –buildtype at elbe create to build the same configuration for a different architecture
<target>
        <hostname>myARM</hostname>
        <domain>tec.linutronix.de</domain>
        <passwd>foo</passwd>
        <console>ttyS0,115200</console>
        <package>
                <tar>
                        <name>nfsroot.tar.gz</name>
                </tar>
        </package>
        <finetuning>
        </finetuning>
        <pkg-list>
                <pkg>build-essential</pkg>
                <pkg>bash</pkg>
                <pkg>less</pkg>
                <pkg>git</pkg>
                <pkg>debhelper</pkg>
                <pkg>nfs-common</pkg>
                <pkg>openssh-server</pkg>
        </pkg-list>
</target>
- The hostname
- and domainname
- This is the root password of the machine.
- This describes, that the resulting rootfilesystem, shall be generated as nfsroot.tar.gz
- finetuning section can be empty. If you need finetuning it can be defined here. The format of this tag is explained above.
- The package list resides here.
Building ubi images
Elbe also has the ability to generate ubi images, including different partitions and mountpoints. Lets look at an example target section.
<target>
        <hostname>myARM</hostname>
        <domain>tec.linutronix.de</domain>
        <passwd>foo</passwd>
        <console>ttyS0,115200</console>

        <images>
                <mtd>
                        <name>linux.img</name>
                        <nr>0</nr>
                        <size>60MB</size>
                        <ubivg>
                                <label>nand</label>
                                <miniosize>2048</miniosize>
                                <maxlogicaleraseblockcount>1533</maxlogicaleraseblockcount>
                                <logicaleraseblocksize>126976</logicaleraseblocksize>
                                <physicaleraseblocksize>128KiB</physicaleraseblocksize>
                                <ubi>
                                        <type>static</type>
                                        <label>kernel</label>
                                        <id>0</id>
                                        <size>4MiB</size>
                                        <binary>/boot/vmlinuz-2.6.33.9-rt31</binary>
                                </ubi>
                                <ubi>
                                        <type>dynamic</type>
                                        <label>rfs</label>
                                        <id>1</id>
                                        <size>26MiB</size>
                                </ubi>
                                <ubi>
                                        <type>dynamic</type>
                                        <label>data</label>
                                        <id>2</id>
                                        <size>30MiB</size>
                                </ubi>
                        </ubivg>
                </mtd>
        </images>

        <fstab>
                <bylabel>
                        <label>data</label>
                        <mountpoint>/opt</mountpoint>
                        <fs>
                                <type>ubifs</type>
                                <mkfs>-x lzo</mkfs>
                        </fs>
                        <options>rw</options>
                </bylabel>
                <bylabel>
                        <label>rfs</label>
                        <mountpoint>/</mountpoint>
                        <fs>
                                <type>ubifs</type>
                                <mkfs>-x lzo</mkfs>
                        </fs>
                        <options>ro</options>
                </bylabel>
                <bydev>
                        <source>proc</source>
                        <mountpoint>/proc</mountpoint>
                        <fs>
                                <type>proc</type>
                        </fs>
                </bydev>
                <bydev>
                        <source>sysfs</source>
                        <mountpoint>/sys</mountpoint>
                        <fs>
                                <type>sysfs</type>
                        </fs>
                </bydev>
                <bydev>
                        <source>tmpfs</source>
                        <mountpoint>/tmp</mountpoint>
                        <fs>
                                <type>tmpfs</type>
                        </fs>
                        <options>size=2M</options>
                </bydev>
                <bydev>
                        <source>tmpfs</source>
                        <mountpoint>/var/log</mountpoint>
                        <fs>
                                <type>tmpfs</type>
                        </fs>
                        <options>size=4M</options>
                </bydev>
                <bydev>
                        <source>tmpfs</source>
                        <mountpoint>/var/run</mountpoint>
                        <fs>
                                <type>tmpfs</type>
                        </fs>
                        <options>size=2M</options>
                </bydev>
        </fstab>

        <finetuning>
        </finetuning>
        <pkg-list>
                <pkg>dash</pkg>
        </pkg-list>
</target>
- This specifies an mtd image with 60MB size whose filename is linux.img
- Parameters for the ubi tools, describing the NAND geometry.
- Specification of ubi volumes.
- specifies the fstab, so that everything can be copied to the right image.
- Normal partition entries are by label.
- The target /etc/fstab file is created with the entries defined in this section. Entries for /proc, /sys etc. can be generated with bydev nodes.
Building harddisk / sdcard images
Elbe also has the ability to generate ubi images, including different partitions and mountpoints. Lets look at an example target section.
<images>
        <hd>
                <name>sda.img</name>
                <size>1900</size>
                <partitions>
                        <primary>
                                <part>1</part>
                                <size>remain</size>
                                <label>rfs</label>
                                <parttype>linux</parttype>
                        </primary>
                </partitions>
        </hd>
        <hd>
                <name>sdb.img</name>
                <size>400</size>
                <partitions>
                        <primary>
                                <part>1</part>
                                <size>remain</size>
                                <label>config</label>
                                <parttype>linux</parttype>
                        </primary>
                </partitions>
        </hd>
</images>
<fstab>
        <bylabel>
                <label>rfs</label>
                <mountpoint>/</mountpoint>
                <fs>
                        <type>ext4</type>
                </fs>
        </bylabel>
        <bylabel>
                <label>config</label>
                <mountpoint>/mnt/config</mountpoint>
                <fs>
                        <type>ext4</type>
                </fs>
                <options>ro</options>
        </bylabel>
        <bydev>
                <source>none</source>
                <mountpoint>/sys/kernel/debug</mountpoint>
                <fs>
                        <type>debug</type>
                </fs>
        </bydev>
</fstab>
- this specifies an hd image
- size of a hd image
- Specification of ubi volumes.
- labels are used to assign mountpoints to partitions
- The target /etc/fstab file is created with the entries defined in this section. Entries for /proc, /sys etc. can be generated with bydev nodes.
A complete reference that is automatically generated from the schema file is also available.
Elbe init (detailed Explanation)
elbe init is now considered a low-level command for advanced Users.
Under normal circumstances elbe initvm should be used. This
paragraph is kept for reference.
The elbe init command generates a project directory, which contains a hard disk image for a virtual build machine and a Makefile to install the build VM and to work with it.
During this process, elbe init will download a linux kernel and
initrd.gz from the debian mirror. In case of a local mirror, be sure,
that dists/jessie/main/installer-amd64/ is also mirrored.
After elbe init has generated the project directory, change to the project directory and run make. This will start the installation of the build VM.